

I have been busy working on Braden's Nursery.
My "theme" is vintage barn chic??!!
You can read more about that HERE.
I am linking up over at Andrea, Erika & Narci's blogs today for Friday Favorites.
I love decorating, DIY and doing it for an amazing price so this definitely qualifies as a favorite!
I am linking up over at Andrea, Erika & Narci's blogs today for Friday Favorites.
I love decorating, DIY and doing it for an amazing price so this definitely qualifies as a favorite!

I had a vision of hanging some lamp shades, mason jars, industrial buckets, etc above the glider and making my own lighting. Sometimes visions don't turn out exactly how I hoped, but this project ended up turning out exactly how I wanted!
You can buy mason lights online, but they are kinda $$ so I decided to make my own.
Here is the final product:

Here is how to do it:
METAL LAMP
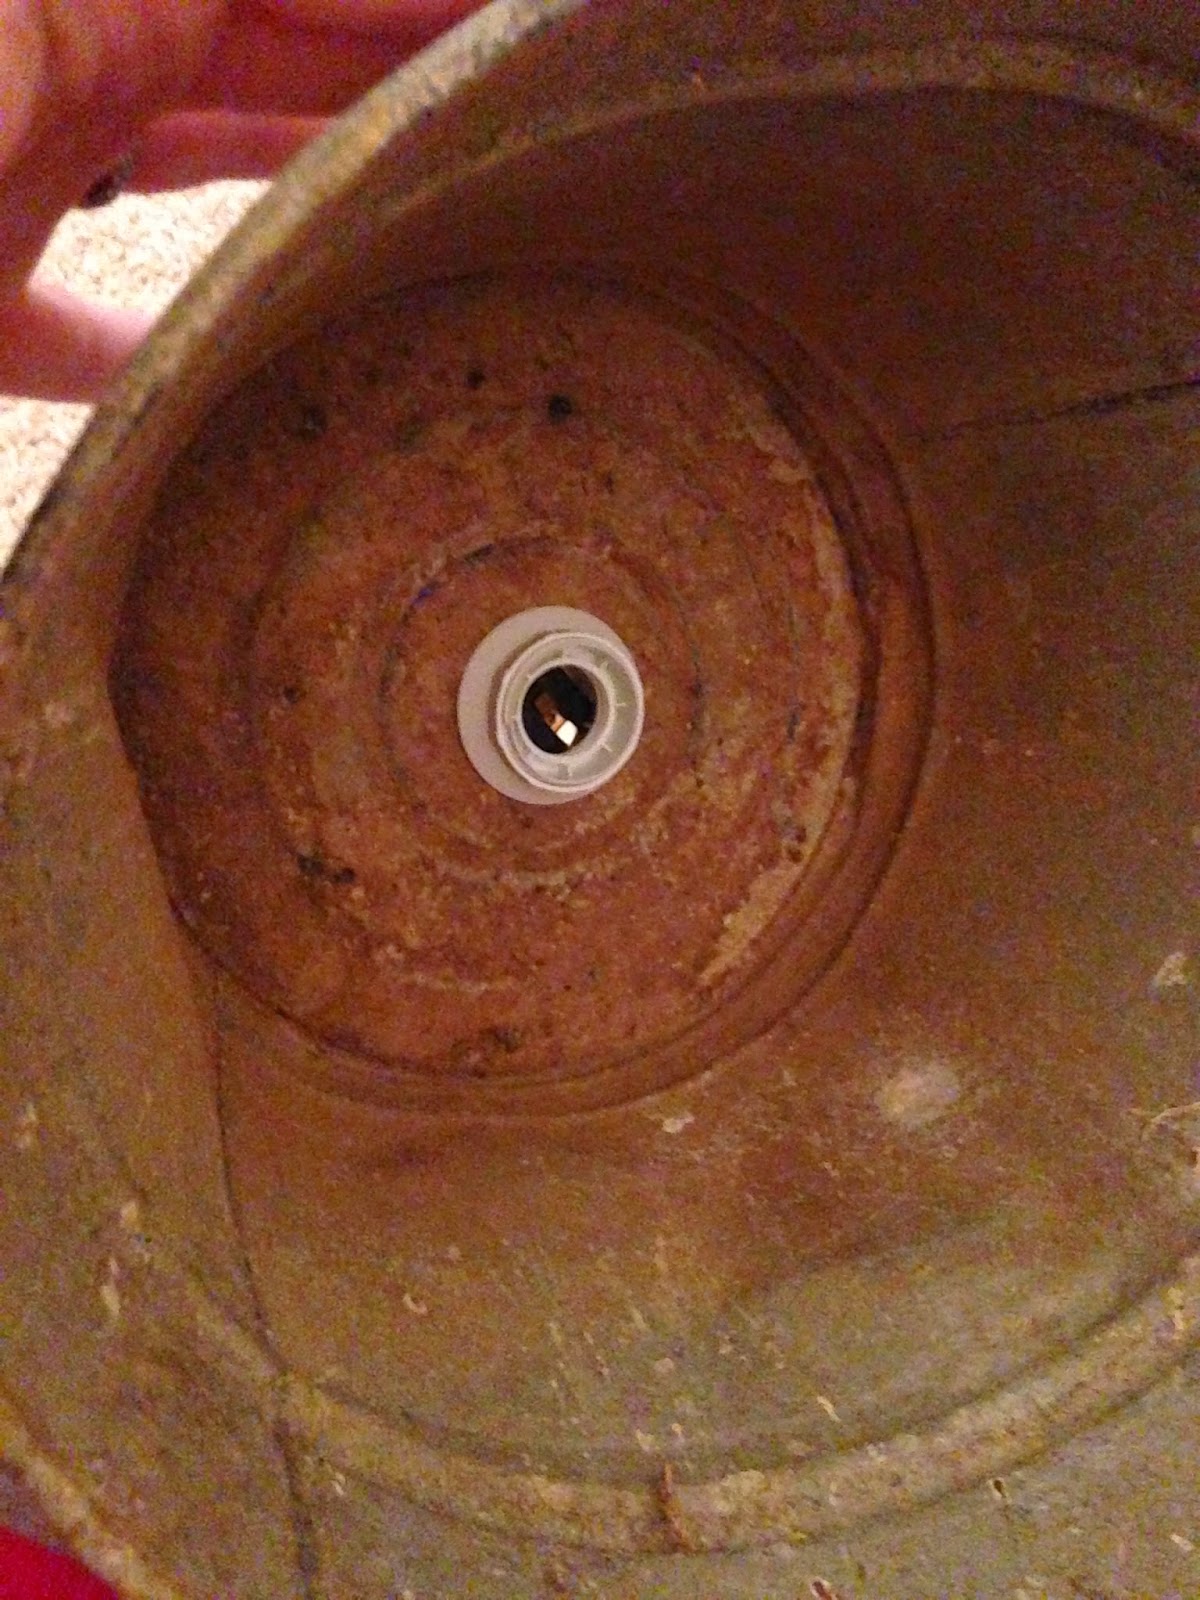
I found an old metal bucket at a flea market for $5.

Then I bought 4 of these Hemma Cord Sets from IKEA for $5 each. 1 per lamp. I drew a circle on the bottom of the bucket the width of the light kit so I could cut a hole to stick it through.


After the hole was drawn, I used a hammer and nail to poke some holes in the metal until I could fit metal cutting scissors in and then cut around my traced circle.

After you have the hole cut you just stick the lamp cord inside. It doesn't have to fit perfectly because you will screw the base of the light on the other side which holds everything in place.

Here you can see from the inside that the plastic part you screw back on the light kit will hold everything in place. Now it is ready for a bulp and once you plug it in you have a lamp!
I followed the exact same steps with the Mason jar light. I found this large mason jar at Target for $6.

I followed the same steps, traced a circle on the top part of the mason jar, cut out the hole, and then placed the light cord inside the hole and screwed the plastic cap back on which secures everything.


Since the Mason Jar is clear I decided to use a vintage lightbulb that I got at Home Depot for $10. Here is what they looked like complete!

Now it was time for the lampshades. It is truly ridiculous how many places I went looking for a good lampshade!! I went to Target, Pier One, HomeGoods, Walmart, JCPenney, etc! I just couldn't find exactly what I was looking for! Then, I went to Garden Ridge (now called At Home) and hit the lampshade lottery! They had so many good choices that I had trouble picking 2!! I had it narrowed down to 5 :)
Here were the 2 I ended up picking:
I wanted a burlap and a linen that I could add my own touches too. I got the burlap one for $12.99 and the linen one for $9.99! Perfect! Also, they had fabric lining which made my next project much easier!

Like I mentioned I wanted to add my own touches so I added a grainsack looking burlap trim to the linen shade. I got it at Joann Fabric and used a 50% off coupon so it was a steal of a deal!

Next I wanted to add a number to the burlap shade. I picked 29 just because I like those 2 numbers in the font I chose. I wish I had some cool story like it was Geoff's highschool number or something...but its just not true :)
I used the same technique to put the number on the shade that I used on my living room lamp...you can read how to do that HERE.
Here are the finished lamp shades.

Then I put the same Ikea light cords through these shades. I had to tape them to the center because I couldn't get them to fit through the middle with the plug on it.

Once all the shades were made it was time to hang them. Not gonna lie...my husband is NOT handy! I have a handyman named Scott who is amazing!!! He is my "honey-do" man around here!! If you are local and need his info let me know....you will LOVE him! He can do anything!
Anyway, he came over and helped me hang them from the ceiling because they would be over my rocking chair in the nursery and I couldn't risk them falling! To hide the cords I bought brown and burlap cord covers from Hobby Lobby. They are $9.99 each and I used the 40% off coupon there because these don't really ever go on their 50% off sale.
I needed 5 cord covers, one for each lamp and then one to cover all the cords going down to the floor. I plugged them into a dimmer so I can dim the lights exactly how I need them...perfect for a sleeping baby!
So excited with how everything turned out!


BEFORE & AFTER

This is a sneak peek of this corner of the nursery....next week on the "My House of Hargrove Tour" I will be doing the great reveal and showing off the completed nursery! SO excited to share it with yall.
I cannot wait to have him join our family and start enjoying his room!

No comments:
Post a Comment